Edit Car Colors for a Single Car with C#
This guide will guide you step-by-step through how to edit one of the colors on a car in F1GP. This guide assumes that you are familiar with Visual Studio, NuGet and C#.
To set the scene, imagine that you have been playing F1GP for a long time, and accepted the fact that the Tyrrells are blue instead of grey, the Modena Team cars have the colors of the Coloni team, and the Coloni team… well, nobody knows what that is supposed to be, their 1990 car but with the wrong wing colors?
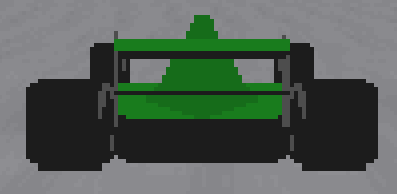
Anyway, you’ve accepted all this, but you do not accept the fact that the top parts of the Jordan’s sidepods are dark green. When we all know that it’s mostly bright green. Just Google it. Here’s the default Jordan in-game:
OK, before we start editing your F1GP files, make sure that you have a backup of everything, or at least the GP.EXE file, because you never know what might happen.
Step 1: Create a project and install ArgData
If you already have a C# project set up in Visual Studio, you can skip this step.
Otherwise, follow the steps in the C# Prerequisites to do this.
Step 2: Get a reference to your EXE file
We’ll just put everything in the Main() method to keep it simple.
First off, we need a reference to the GP.EXE that we want to edit.
var exeFile = GpExeFile.At(@"C:\Games\GPRIX\GP.EXE");
Step 3: Fetch the Car that we want to edit
ArgData uses Reader classes for fetching data from GP.EXE, and Writer classes to update GP.EXE. We want to retrieve the Jordan that we want to edit first, then we will update the color we are unhappy with, and then we will write the new information back to GP.EXE.
But first things first, create a CarColorReader and retrieve the Jordan car.
var reader = CarColorReader.For(exeFile);
var car = reader.Read(16);
The reader is created by using the static For method and passing in the reference to the exeFile. We then
read information for the 17th car in the game, and since the index is zero-based, that means that we pass in 16.
The car has a number of panels we can paint, but right now we are mostly interested in the one called
SidepodTop. The value that we assign to SidepodTop is the index of the color in the 256-color palette that
the game has. Now we just need to decide on a color.
Step 4: Setting a new color for the top of the sidepods
But how do we know which color index to use? We will look at the Palette Colors page here and decide. Ready? Let’s go…
…which color did you choose? Perhaps none of them perfectly matches the bright green of the top of the 1991 Jordan’s sidepod, but for the sake of doing something, let’s go with 77.
car.SidepodTop = 77;
But now we need to write the data back to our GP.EXE file, and for that we need a CarColorWriter.
Step 5: Writing data back to GP.EXE
The CarColorWriter that we use to write car colors is created in much the same way as the CarColorReader.
After creating the writer, we will call its WriteCarColors method and pass in the car that we have edited,
and the index of which car in the game we will update. Since we want to update the Jordan, we again pass in
index 16, just like when we read the data.
var writer = CarColorWriter.For(exeFile);
writer.WriteCarColors(car, 16);
Step 6: How did it go?
Now run your console application. It should run without problems and since we didn’t add a ReadKey or similar,
it will just blink and be done.
Time to start F1GP and see how the Jordan looks…
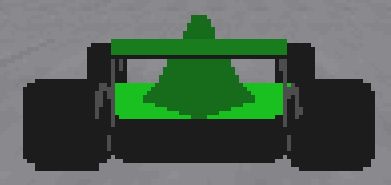
Success!
Congratulations! You have just edited F1GP successfully using ArgData!